En este artículo os quiero mostrar cómo se pueden crear Tablas Dinámicas en Bricks para WordPress. Aprenderemos a crear un loop de las entradas de WordPress y filtrarlas por el nombre de una Categoría.
En el Vídeo muestro cómo se filtran las entradas de WordPress mediante una categoría. Además las entradas de esa categoría contienen unos campos personalizados que mostraremos también en la tabla Dinámica. Si no has visto el vídeo donde explico cómo se hace, ahora es el momento de que lo veas.
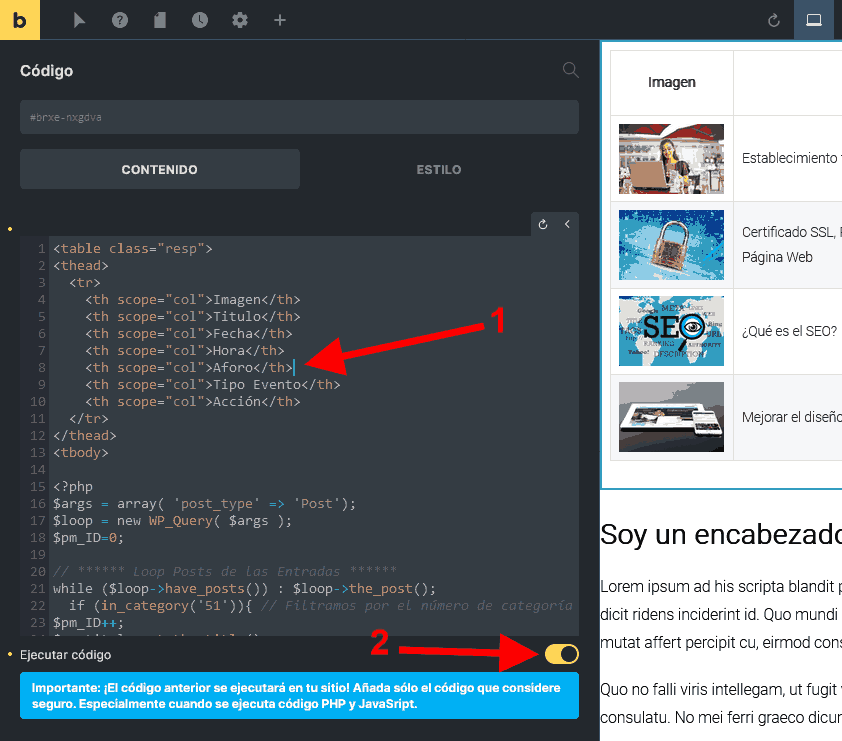
Mediante estas capturas de abajo te explico dónde se debe poner el código Html y PHP que puedes copiar en este artículo:
En el campo donde indica la flecha 1 debes pegar el código que te pongo más abajo. Recuerda que una vez hayas pegado el código, tienes que pulsar en el botón «Ejecutar Código» que te indico en la flecha 2 de la imagen de arriba.
Código HTML y PHP (Copialo y pegalo donde te he indicado)
<table class="resp">
<thead>
<tr>
<th scope="col">Imagen</th>
<th scope="col">Titulo</th>
<th scope="col">Fecha</th>
<th scope="col">Hora</th>
<th scope="col">Aforo</th>
<th scope="col">Tipo Evento</th>
<th scope="col">Acción</th>
</tr>
</thead>
<tbody>

<?php
$args = array(
  'post_type' => array('post'),
  'posts_per_page' => '1000'
  );
$loop = new WP_Query( $args );
$pm_ID=0;

// ****** Loop Posts de las Entradas ******
while ( $loop->have_posts() ) {
$loop->the_post();
if (in_category('51')){ // Filtramos por el número de categoría
$pm_ID++;
$pm_titulo=get_the_title();
$pm_fecha=get_field('fecha_evento');
$pm_hora=get_field('hora_evento');
$pm_aforo=get_field('aforo');
$pm_tipo=get_field('tipo_evento');
$pm_enlace=get_permalink();
$pm_imagen = wp_get_attachment_image_src( get_post_thumbnail_id(), 'medium' );
?>
<tr>
<td><img src="<?=$pm_imagen[0]?>" width="120"></td>
<td><?=$pm_titulo?></td>
<td><?=$pm_fecha?></td>
<td><?=$pm_hora?></td>
<td><?=$pm_aforo?></td>
<td><?=$pm_tipo?></td>
<td><a class="bricks-button sm bricks-background-primary" href="<?=$pm_enlace?>">Ver Evento</a></td>
</tr>
<?php
}
}
?>
</tbody>
</table>
Ahora deberás copiar el código CSS que te pongo más abajo y pegarlo donde te indico en las capturas de abajo.
Código CSS (Copialo y pegalo donde te he indicado) AVISO, no lo pegues en el mismo sitio donde se pone el codigo HTML porque te dará problemas.
table {
width: 100%;
background: white;
margin-bottom: 1.25em;
border: solid 1px #dddddd;
border-collapse: collapse;
border-spacing: 0;
}

table tr th,
table tr td {
padding: 0.5625em 0.625em;
font-size: 0.875em;
color: #222222;
border: 1px solid #dddddd;
}

table tr.even,
table tr.alt,
table tr:nth-of-type(even) {
background: #f9f9f9;
}


@media only screen and (max-width: 768px) {
table.resp,
.resp thead,
.resp tbody,
.resp tr,
.resp th,
.resp td,
.resp caption {
display: block;
}

table.resp {
border: none
}

.resp thead tr {
display: none;
}

.resp tbody tr {
margin: 1em 0;
border: 1px solid #2ba6cb;
}

.resp td {
border: none;
border-bottom: 1px solid #dddddd;
position: relative;
padding-left: 45%;
text-align: left;
}

.resp tr td:last-child {
border-bottom: 1px double #dddddd;
}

.resp tr:last-child td:last-child {
border: none;
}

.resp td:before {
position: absolute;
top: 6px;
left: 6px;
width: 45%;
padding-right: 10px;
white-space: nowrap;
text-align: left;
font-weight: bold;
}

td:nth-of-type(1):before {
content: "Imagen";
}

td:nth-of-type(2):before {
content: "Título";
}

td:nth-of-type(3):before {
content: "Fecha";
}

td:nth-of-type(4):before {
content: "Hora";
}

td:nth-of-type(5):before {
content: "Aforo";
}

td:nth-of-type(6):before {
content: "Tipo Evento";
}

td:nth-of-type(7):before {
content: "Acción";
}
}
Este es el resultado de cómo se vería esta Tabla Dinámica realizada en Bricks para WordPress


